

Welcome to the exciting world of OpenAI’s recently announced Assistants API. This groundbreaking API allows developers to create intelligent and conversational assistants that can understand and respond to human language. Whether you’re an experienced developer or a curious beginner, this hello world project is perfect for anyone who wants to dive into the capabilities of the Assistants API and it’s time to explore the possibilities to change how we interact with Open AI API. Let’s get started!
Essential Resources:
- NodeJS
- OpenAI npm version 4.16.1 or later (installable via
npm install openai) - dotenv npm (installable via
npm install dotenv) - An active OpenAPI key
I highly recommend delving into the OpenAI Assistants API documentation because this documentation introduces several new and crucial concepts that are fundamental to understanding and effectively utilizing the API.
Step-by-Step Coding Guide:
1. Start by creating a “.env” file.
In this file, you need to include your specific OpenAI API key, which you can obtain from your OpenAI developer account. Format it as follows:
OPENAI_API_KEY="YOUR OPENAI API KEY"
2. Next, create a script file.
For instance, create mathAssistant.js and insert the following NodeJS code into this file:
// Import the required dependencies
require("dotenv").config();
const OpenAI = require("openai");

// Create an OpenAI connection with the API key from the environment variables
const openai = new OpenAI({ apiKey: process.env.OPENAI_API_KEY });

// Define an asynchronous function to prompt the user for input
async function askQuestion(question) {
    process.stdout.write(question);
    return new Promise((resolve) => {
        process.stdin.once('data', data => resolve(data.toString().trim()));
    });
}

// Define the main asynchronous function
async function main() {
    try {
        // Print the first greeting for User
        process.stdout.write("\nAssistant: Hello there, I'm your personal math tutor assistant.\n");

        // Create a new AI assistant instance using the OpenAI API
        const assistant = await openai.beta.assistants.create({
            name: "Math Tutor",
            instructions: "You are a personal math tutor. Answer math questions.",
            model: "gpt-3.5-turbo-1106",
        });

        // Create a new conversation thread for interacting with the assistant
        const thread = await openai.beta.threads.create();

        // Enter a loop to continue asking questions as long as the flag is true
        let keepAsking = true;
        while (keepAsking) {
            // Prompt the user to input a question
            const userQuestion = await askQuestion("\nAssistant: What is your question?\n\nYou: ");

            // Print the assistant's thinking message
            process.stdout.write(`\nAssistant: Thinking...\n`);

            // Add the user's question to the conversation thread
            await openai.beta.threads.messages.create(thread.id, {
                role: "user",
                content: userQuestion,
            });

            // Initiate a run to get the assistant's response
            const run = await openai.beta.threads.runs.create(thread.id, {
                assistant_id: assistant.id,
            });

            // Use a polling mechanism to check if the run is completed
            let runStatus;
            do  {
                await new Promise((resolve) => setTimeout(resolve, 2000));
                runStatus = await openai.beta.threads.runs.retrieve(thread.id, run.id);
            } while (runStatus.status !== "completed")

            // Retrieve the list of messages in the conversation thread
            const messages = await openai.beta.threads.messages.list(thread.id);

            // Filter and reverse the messages to get the assistant's response from the current run
            const assistantMessages = messages.data
                .filter(
                    (message) => message.run_id === run.id && message.role === "assistant"
                ).reverse();

            // Remove assistant's thinking message
            process.stdout.moveCursor(0, -2);
            process.stdout.clearLine(1);

            // Loop through the assistant messages and print them
            assistantMessages.forEach(assistantMessage => {
                process.stdout.write(`\nAssistant: ${assistantMessage.content[0].text.value}\n`);
            });

            // Then ask if the user wants to ask another question
            const continueAsking = await askQuestion("\nAssistant: Do you want to ask another question? (yes/no)\n\nYou: ");
            keepAsking = continueAsking.toLowerCase() === "yes";

            // Display an ending message if the user does not want to ask another question
            if (!keepAsking) {
                process.stdout.write("\nAssistant: Thanks, I hope you learned something!\n\n\n");
            }
        }

        process.exit();
    } catch (error) {
        // Catch any potential errors thrown within the try block
        console.error(error);
    }
}

// Call the main function
main();
This code, although put together swiftly and explained briefly in the comments, serves as a solid foundation. It has potential for enhancements, particularly in the polling mechanism, which is a crucial aspect of such interactive applications.
3. Executing Your Code:
To run your script, open your terminal, navigate to the directory where your files are, and execute the mathAssistant.js file using the command:
node mathAssistant.js
4. Recap
This is the result:
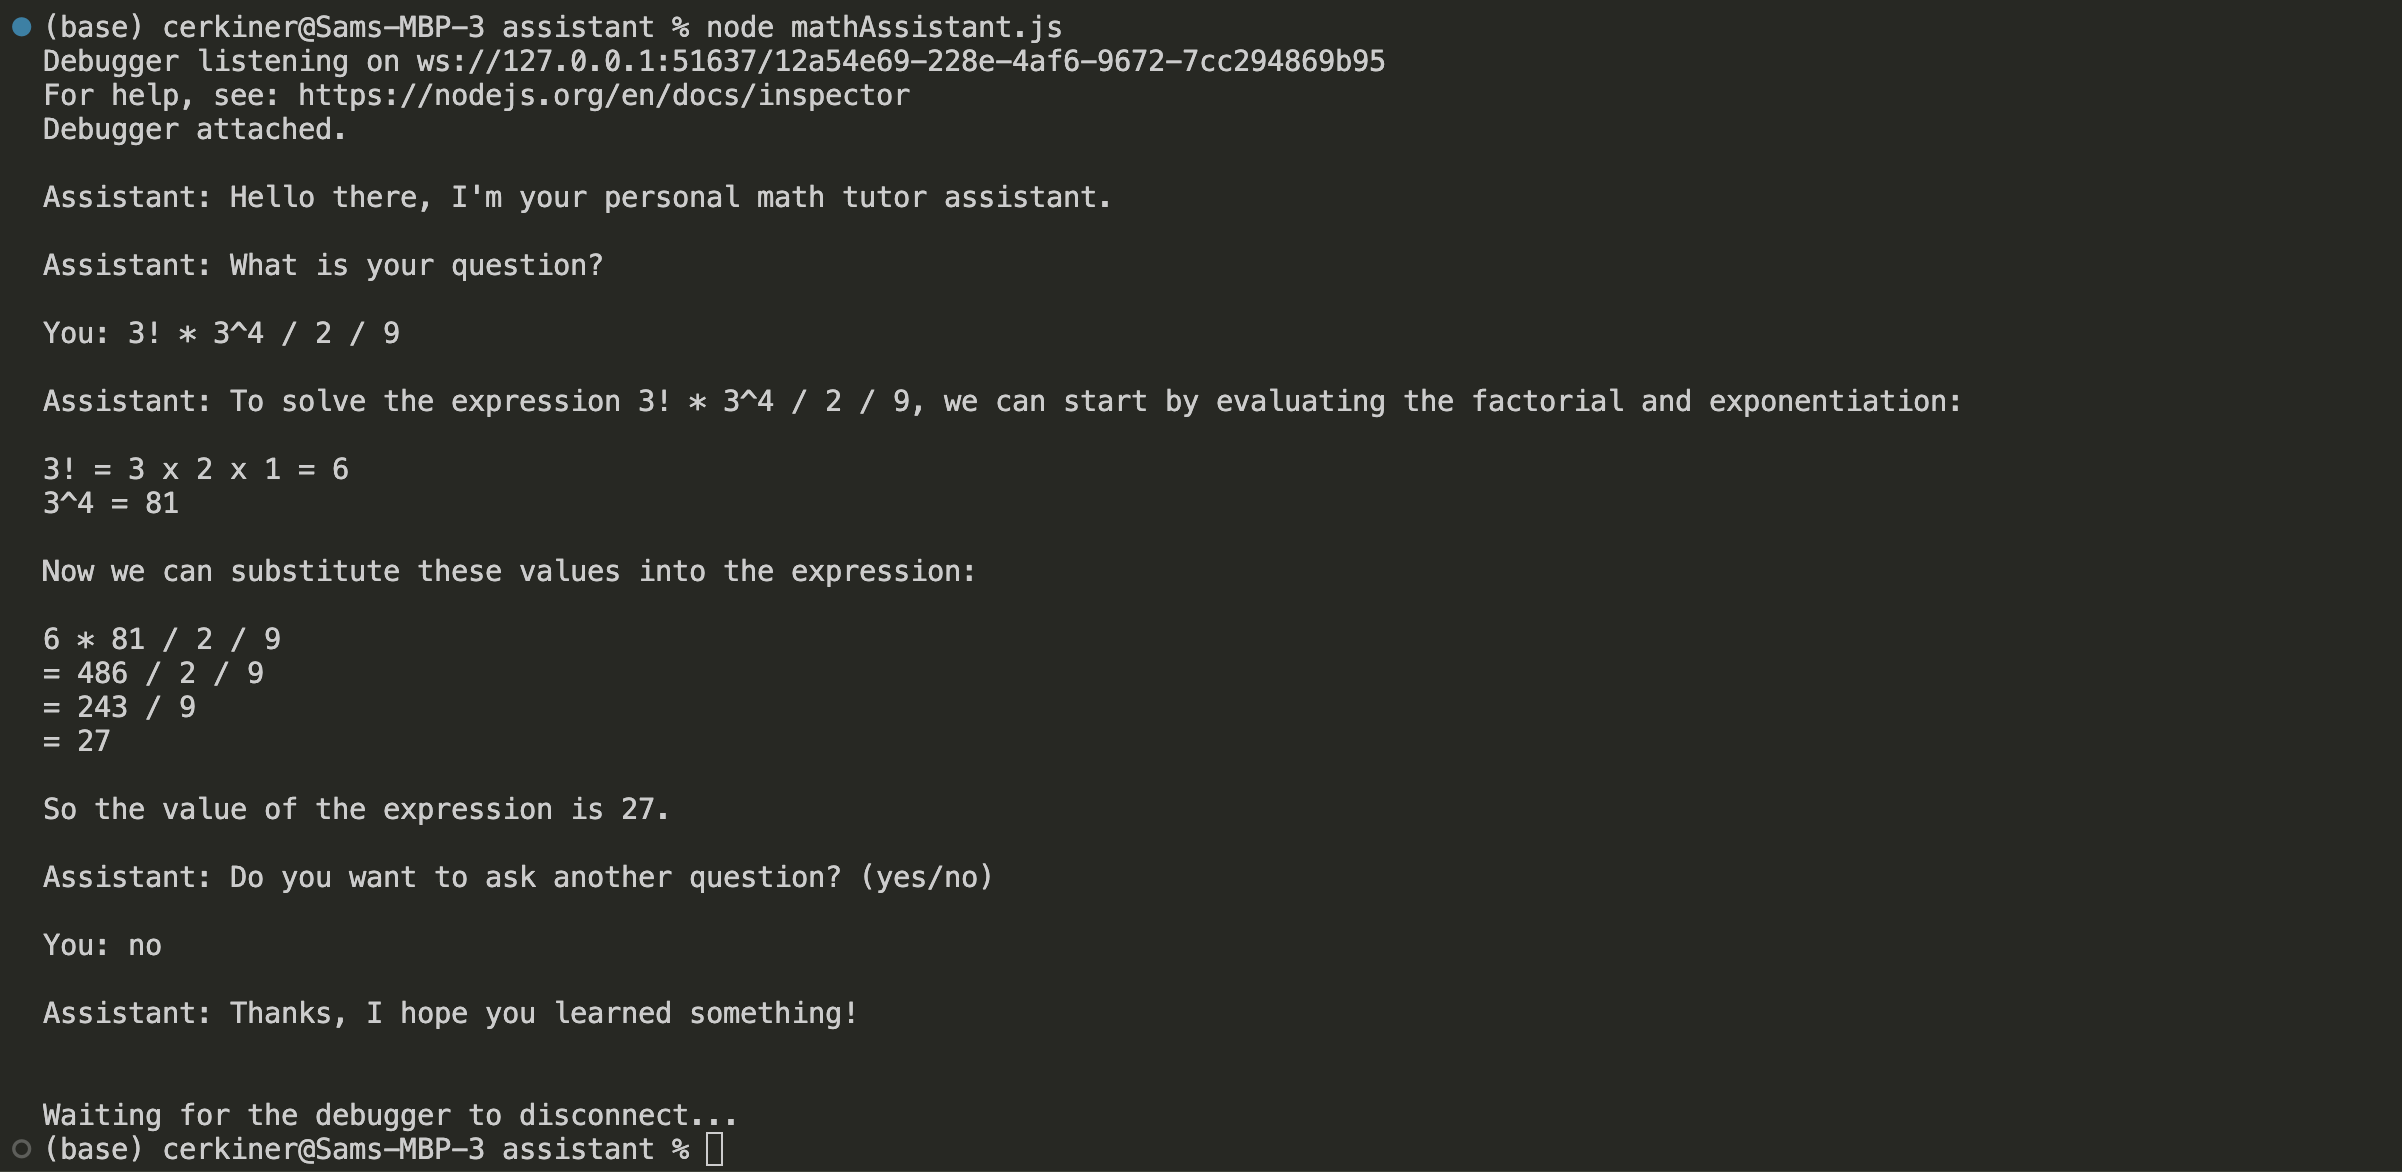
To recap, this JavaScript code sets up a communication interface with the OpenAI service to create an AI assistant for answering math questions. Here’s a breakdown of the code:
- Dependencies: The
dotenvandopenaipackages are imported to manage environment variables and interact with the OpenAI API. - OpenAI Connection: An instance of the OpenAI client is created with the API key retrieved from the environment variables.
- Asynchronous User Input: An asynchronous function
askQuestionis defined to prompt the user for input. It usesprocess.stdin.onceto capture the user’s response. - Main Function: The
mainfunction is defined as the entry point. It starts by greeting the user and then creates an AI assistant instance using the OpenAI API. - Conversation Thread: A new conversation thread is created for interacting with the AI assistant.
- Asking Questions Loop: Inside a loop, the user is prompted to input a question, and the assistant’s thinking message is displayed. The user’s question is added to the conversation thread, and a run is initiated to get the assistant’s response.
- Polling Mechanism: The code uses a polling mechanism to check if the run is completed before retrieving the assistant’s response.
- Display Assistant’s Response: The assistant’s responses are filtered, reversed, and printed to the console.
- User Interaction: After each interaction, the user is asked if they want to ask another question. The loop continues until the user indicates they do not want to ask another question.
- Error Handling: Any errors that occur within the
tryblock are caught and logged to the console. - Function Invocation: Finally, the
mainfunction is called to start the interaction with the AI assistant.
The code demonstrates an interactive session where the user can ask math-related questions, and the AI assistant provides answers.